| 일 | 월 | 화 | 수 | 목 | 금 | 토 |
|---|---|---|---|---|---|---|
| 1 | 2 | 3 | ||||
| 4 | 5 | 6 | 7 | 8 | 9 | 10 |
| 11 | 12 | 13 | 14 | 15 | 16 | 17 |
| 18 | 19 | 20 | 21 | 22 | 23 | 24 |
| 25 | 26 | 27 | 28 | 29 | 30 | 31 |
- programmers
- 정보처리기사 실기
- Pod
- ios 26
- 위클리챌린지
- Xcode
- IOS
- 정보처리기사 실기 요약본
- UITableViewCell 동적높이
- uikit
- cocoapods
- ios외부카메라연결
- swift
- 2018 KAKAO BLIND RECRUITMENT
- ios카메라유선연결
- UITableView
- AVFoundation
- Codable
- UITableViewCell dynamic height
- JSON
- 정보처리기사
- JSONParser
- CustomCode
- ios외부디바이스연결
- parse
- Decodable
- Realm
- usb카메라연결
- avcapturesession
- 프로그래머스
- Today
- Total
iOS 개발일기
[Xcode] SceneDelegate 삭제하기 본문
개발환경
| macOS | Catalina 10.15.4 |
| Xcode | 11.4 |
| iOS | 13.4 (Simulator : iPhone 11 Pro) |
몇달 전에 여느 때와 다름없이 새 프로젝트를 켜고 AppDelegate로 들어가서 커스텀 코딩으로 rootViewController를 설정하려고 보니 SceneDelegate라는 녀석이 새로 생겨서 당황했었던 것이 기억난다.
(나는 초보 개발자여서 업데이트 노트를 일일히 보지않았기 때문에...)
여튼 처음에는 무시하고 AppDelegate에다가 커스텀 코딩을 했었는데 역시나 에러가 주구장창떠서 살펴보니 Xcode11버전으로 업데이트 되면서 생긴 SceneDelegate에서 코딩을 해주어야 하고 Storyboard를 삭제해주어야 했다.
그래서 유지보수를 하다가 나중에 새 프로젝트를 만들때 편하기위해 적어두는 것이다.
(이번에 새 프로젝트를 생성하는데 까먹어서 다시 기억을 더듬어야 했기 때문에...)
스토리보드를 사용하지않고 rootViewController를 설정하는 방법에는
크게는 두 가지 방법이 있다.
첫 번째는 SceneDelegate에 rootViewController를 설정하는 방법과
두 번째는 SceneDelegate를 삭제하고 AppDelegate에 rootViewController를 설정하는 방법이 있다.
방법 하나. AppDelegate에 rootViewController를 설정하는 방법
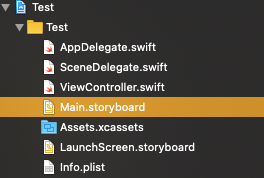
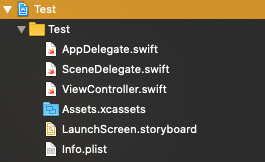
1. Main.storyboard remove
내가 프로젝트를 만들고 가장 먼저 해주는 것은 Main.storyboard를 삭제해주는 것이다.
Main.storyboard는 사용하지 않기 때문에 삭제해준다.

2. Main Interface remove
| 프로젝트 클릭 -> Deployment Info -> Main Interface -> Main 삭제(공백으로 비워두면 됩니다.) |
* 삭제해주지 않는다면 Main.storyboard를 메인 인터페이스로 인식하기 때문에 컴파일할 경우에 에러가 발생하게 된다.


3. Application Scene Manifest remove
| Info.plist -> Application Scene Manifest 삭제 |
SceneDelegate를 사용하지 않기 때문에 삭제해주셔야 됩니다.

4. SceneDelegate remove

5. rootViewController Custom Code
AppDelegate에서 MARK표시로 주석 되어있는 부분을 지워주어야 합니다.
//AppDelegate.swift

// MARK: UISceneSession Lifecycle
func application(_ application: UIApplication, configurationForConnecting connectingSceneSession: UISceneSession, options: UIScene.ConnectionOptions) -> UISceneConfiguration {
	// Called when a new scene session is being created.
	// Use this method to select a configuration to create the new scene with.
	return UISceneConfiguration(name: "Default Configuration", sessionRole: connectingSceneSession.role)
}

func application(_ application: UIApplication, didDiscardSceneSessions sceneSessions: Set<UISceneSession>) {
	// Called when the user discards a scene session.
	// If any sessions were discarded while the application was not running, this will be called shortly after application:didFinishLaunchingWithOptions.
	// Use this method to release any resources that were specific to the discarded scenes, as they will not return.
}
위 두 함수를 제거해주시면 됩니다.
그 다음,
AppDelegate에서 rootViewController를 지정해주는 Custom Code를 작성합니다.
//AppDelegate.swift

var window: UIWindow?

func application(_ application: UIApplication, didFinishLaunchingWithOptions launchOptions: [UIApplication.LaunchOptionsKey: Any]?) -> Bool {

    window = UIWindow(frame: UIScreen.main.bounds)
    window?.makeKeyAndVisible()

    let root = ViewController()
    window?.rootViewController = root
}
6. Test
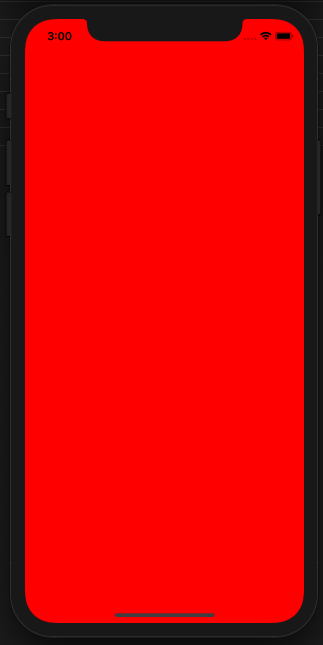
ViewController에서 간단하게 배경색만 변경하여 rootViewController가 제대로 설정되었는지 확인해보겠습니다.
//ViewController.swift

override func viewDidLoad() {
    super.viewDidLoad()

    view.backgroundColor = .red
}
실행을 하게되면 아래와 같은 결과를 얻을 수 있습니다.

여기까지가 첫번째방법인 AppDelegate로 rootViewController를 설정하는 방법입니다.
방법 두울. SceneDeleate에 rootViewContrller를 설정하는 방법
1. Main.storyboard remove
방법 하나와 같이 Main.storyboard를 삭제해줍니다.

2. Main Interface remove
| 프로젝트 클릭 -> Deployment Info -> Main Interface -> Main 삭제(공백으로 비워두면 됩니다.) |


3. Property Storyboard remove
| Info.plist -> Application Scene Manifest -> Scene Configuration -> Application Session Role -> Item -> Storyboard Name 삭제 |
* 이것도 마찬가지로 Storyboard를 사용하지 않기 때문이다.


4. rootViewController Custom Code
SceneDelegate에서 rootViewController를 지정해주는 Custom Code입니다.
//SceneDelegate.swift

var window: UIWindow?

func scene(_ scene: UIScene, willConnectTo session: UISceneSession, options connectionOptions: UIScene.ConnectionOptions) {
	guard let windowScene = (scene as? UIWindowScene) else {return}

	window = UIWindow(frame: windowScene.coordinateSpace.bounds)
	window?.windowScene = windowScene
	window?.makeKeyAndVisible()

	let root = ViewController() //your main view controller
	window?.rootViewController = root
}
5. Test
이제 rootViewController가 제대로 설정되었는지 ViewController에서 배경색을 변경하여 확인해보겠습니다.
//ViewController.swift

override func viewDidLoad() {
    super.viewDidLoad()

    view.backgroundColor = .blue
}
간단하게 배경색만 설정해준 다음 실행하면 아래와 같은 결과가 나오게 됩니다.

'iOS > Xcode' 카테고리의 다른 글
| [Xcode] 프로젝트 복사 (0) | 2020.10.22 |
|---|
